Saturday, December 31, 2016

Proxmox Server Part I: The Hardware

Before I begin, I would like to extend my warmest holiday wishes to all. This Christmas was very special for me and my family as this was my daughter's first real Christmas (she was two months old this time last year). :-)

Since 2013, I have been primarily using ESXi as my hypervisor of choice for my lab and home network needs (Domain Controller, DNS, DHCP, RADIUS, etc.) Back in September, my ESXi server began randomly crashing, seemingly with no logs indicating what may be occurring. While troubleshooting this issue, I recognized the need for some sort of backup. Rather than going the traditional route of adding a secondary ESXi server, I decided to purchase a refurbished server and give Proxmox a try. 

The goal of this build was to build a cost effective backup and avoid incurring the costs of building a brand new server. Build preferences included:
  1. 2x Xeon CPUs 
  2. 64GB RAM (Minimum)
  3. 4x Hot Swap Bays (Minimum)
  4. 2x Integrated Network Interfaces (Minimum)
  5. ESXi supported Hardware RAID controller (In case Proxmox is abandoned)
  6. 2 Units / Rack (Maximum)
  7. Out-of-Band Management

I was able to find an excellent deal on a Dell R710 server on eBay that met and exceeded all of my specifications (see below).

  1. Dual Xeon X5570 2.93GHz
  2. 64 GB ECC DD3 
  3. 8x 2.5'' SATA Hot swap Bays
  4. 2x 500GB 7.2K Dell Enterprise HDDs
  5. 4x Integrated NetXtreme II Gigabit Network Interfaces
  6. PERC H700 RAID Controller
  7. 2U 
  8. iDRAC6 Support (Out-of-Band)
  9. Dual PSUs 
  10. Rail Kit Included
  11. 90 Day Warranty

Server Price:  $285.00
Shipping:        $47.14

The only items that i needed to purchase separately were the additional SSDs (my preference) for boot, the actual iDRAC6 interface (not included with server), and additional drive caddies.
  1. 2x CISNO 2.5" SAS HDD Tray/Caddy for Dell R710  - $25.80
  2. 5pk Dell Expansion Slot Cover - $5.25
  3. Dell K869T iDRAC6 Interface -  $9.99
  4. Assurant Protection Plan - $11.99
  5. 2x Black Diamond BDSSDS128G-MU 128GB SSD - $62.40 

Subtotal: $115.43
Shipping: $34.03

GRAND TOTAL: $481.60

Though refurbished, that's a lot of horsepower for less than $500. This is especially pleasing considering my 2013 ESXi build, consisting of all new hardware, was more than $2500. See the hardware below. 

Dell R710 - 2U/Dual Xeon X5570/64GB DDR3/8 Hot Swap Bays


SSDs installed in Bays 0 and 1, HDDs in 2 and 3


Dual Xeon X5570 - 16/19 DIMM slots populated 
Quad-Port Integrated NIC / Dual-Port Add-In NIC (Spare) / OOB Interface

Tucked tightly between my ESXi server and lab-only Cisco Catalyst 3750


 The only real issue I ran into was the SSDs that i purchased (mentioned above), though listed as enterprise grade on NewEgg, were not welcomed by the Perc H700 RAID controller. The controller continued throwing errors about drive failures on slots 0 and 1 (the slots the SSDs populated). The drives worked perfectly and passed all tests and were even successfully configured for RAID-1 by the controller but errors continued to fill the server's logs and the indicator lights continued to show amber LEDs. After doing some research, I found that Dell (and likely other OEMs) RAID controllers do not play nice with non-Dell, non-Enterprise storage devices. One Dell forum user mentioned that enterprise grade Intel SSDs can be used without throwing errors on the controllers. 

Luckily, I had two enterprise 80GB Intel S3510 SSDs  being used as boot drives (mirrored) in my FreeNAS build. As many FreeNAS users can agree, the Intels might have been overkill for the FreeNAS box because FreeNAS is generally not extremely picky about the boot drives that it uses. As a matter of fact, many FreeNAS builders recommend using USB thumb drives as the boot disk. So I simply removed the Black DIamond SSDs from the server, connected them to the FreeNAS box, mirrored the boot from the Intels, and verified functionality. Afterwards, I installed the Intel S3510 SSDs in the server and, voila; all disk errors were cleared. 

As far as storage is concerned, I ran my typical hypervisor setup of four drives; two SSDs housing the operating system in RAID-1 and two local storage (data) HDDs in RAID-1. 

iDRAC6 worked well with minimum configuration as with most out-of-band management interfaces. Typical features such as remote power control, console access, virtual media mounting, and logging are all available from the iDRAC6 interface. Of course i managed all RAID configuration and OS deployment from the iDRAC6 embedded web server. 


Overall, the Dell R710 is an excellent piece of hardware to lab with for virtualization practice. In subsequent posts, I will detail my experiences with Proxmox and my overhaul of my virtual infrastructure. I hope everyone has a happy and safe New Year and I look forward to blogging in 2017. 


Wednesday, November 2, 2016

GNS3 Server

Around this time last year, I purchased a subscription to Cisco's VIRL which I had spent a year prior debating. I was excited to get everything up and going but to be completely honest, after about a month and a half of experimenting with VIRL, I was disappointed. VIRL's hardware requirements were too high for most self-funded labbers, setup of simulations and deployment often took up one third of my lab time, and there were many key features missing from the VMs despite this product coming directly from Cisco. This is not to bash VIRL, I just don't believe that the product had matured enough before it was released. Also, to be fair, I have not used VIRL since earlier this year, so many of these issues that I am mentioning are not only a matter of opinion, but may have been fixed since then. I do applaud the efforts and the idea of VIRL but it still doesn't quite measure up to the venerable GNS3 in my opinion; which brings me to the purpose of this post. 

GNS3 has been an invaluable study tool. I am always a fan of buying the real hardware, but for larger topologies with medium to high levels of network redundancy, that may be cost-prohibitive. After I benched VIRL, I got back into GNS3 considering I was moving into the ROUTE portion of the CCNP. GNS3 is great but using it across multiple clients and maintaining several copies of topologies across those clients (combination of Windows and Ubuntu) was becoming time consuming. To resolve that, I decided to start saving all of my topologies to my ownCloud (FreeNAS) server. Deploying them and saving them from there was easy and I didn't have to maintain multiple copies of the same topology across several devices. I could build a topology on my Ubuntu desktop, make changes, close, and see those changes available in one of my Windows 10 VMs or on my Ubuntu laptop. That solved one issue. The other issue is that my topologies were growing in size. GNS3 is a lot better on system resources than VIRL but I was pushing the limits. 

I decided to re-purpose a Supermicro server that I bought several years ago. I had since been using it as an ESXi test server along side my primary ESXi host. I loaded Ubuntu Server 16.04 on it and installed GNS3 server. Installing GNS3 server on Ubuntu Server takes less than 15 minutes and was easily done via these instructions that I was able to find in a quick search. The instructions note that GNS3 runs on port 8000 but GNS3 changed the default port to TCP 3080 several months ago. 

In any case, running GNS3 on a dedicated server has proven to have numerous advantages. First and foremost, this reduces the load on a standard or even higher end desktop or laptop. I'm able to run much larger topologies on the server with a hyper-threaded quad core Xeon and 24GB of DDR2. It's an older server but it gets the job done. 


Below is a sample of one of my CCNP topologies. This one simulates an EIGRP network composed of an enterprise core, WAN edge, several branch offices connected over Frame-Relay and Ethernet links, an Internet edge running iBGP and eBGP, and simulated ISP routers. GNS3 has come a long way from just supporting older 1700, 2600, 3600, 3700, and 7200 series routers. GNS3 has a marketplace that allows you to integrate several types of appliances including Cumulus Linux VX switches, various load balancers, VyOS, several Linux virtual machines (that serve as excellent endpoints), ntopng, Openvswitch and much more via Qemu virtual machines. It's amazing that I don't hear more about these features. One of the best to me is that you can use the same images used in VIRL (if you have a valid subscription and access to the images) to use IOS-XRv, ASAv, IOSv, IOSvL2, CSR1000v, and NX-OSv. You basically get VIRL with lower resource consumption.  


The edge and ISP routers in this topology are Cisco IOSv VMs while the core is IOSvL2 (basically an L3 switch), and the WAN aggregation are traditional 2600, 7200, and 3600 series IOS images. This is a medium-sized topology with several Linux virtual machines running as network hosts/clients to test communication outside of IOS. My physical server has two interfaces, so I use one for management and one that connects to the cloud for routing traffic from my virtual network to my physical network. My GNS3 network devices and clients receive NTP updates, DNS, and even has regular internet access through this interface. I connect both edge routers to a dumb switch in GNS3 that allows both to uplink off my physical Catalyst 3750 core switch. They run eBGP to simulate a real Internet connection and I redistribute those routes into my physical core's OSPF process to route traffic to my upstream Internet gateway. It really is amazing what you can do with GNS3 now. 

Another feature that I think is not getting enough attention is the fact that the integration of VIRL images allows for a good bit of switching features but definitely not 100%. For instance, you can set up HSRP but any connected hosts are unable to communicate with the virtual IP. They can communicate within the same VLAN and traffic can be routed to other interfaces but only using the VLAN IP. When it comes to switching, you don't get anything more than you would get in VIRL. 

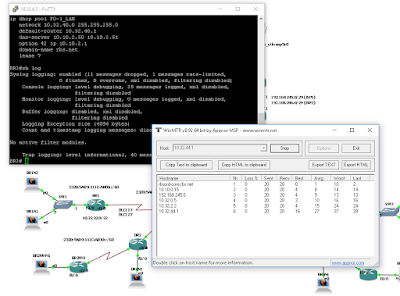
Below are more screenshots of the same EIGRP lab. It's a dual-stack lab (IPv4 and IPv6) but routing protocols are only being applied to IPv4 currently. I was testing IPv6 for more basic features like link-local communication, EUI-64, DHCPv6 (to hosts), NDP, and understanding router advertisements and solicitations. 

ICMP communication from a GNS3 VM to the actual Internet. 
Routing table of GNS3 WAN router showing EIGRP-advertised default route.


Telnet session from physical PC to GNS3 router and MTR session.

GNS3 ISP transit-router showing BGP routing table.
For ROUTE, GNS3 is proving to be one of my most invaluable tools, especially with all of the new features added. I can't recommend it enough to anyone currently studying routing concepts. If GNS3 ever gets switching integrated 100%, it will truly be a network student's Swiss army knife. For the time being, it is more than sufficient for routing labs. I also highly recommend setting up a GNS3 server where possible. I tried deploying a GNS3 VM in several forms on ESXi and it was an insatiable CPU devouring vampire, no matter how much I tweaked the Idle-PC settings or adjusted resources in ESXi. It simply required more than I could give it as a VM on the CPU-front. I'm sure some more knowledgeable ESXi expert could get it to work much better, but I shamelessly went bare metal. Overall, my GNS3 server is proving to be an excellent investment in my studies. 

Have a similar experience? Have recommendations? Feel free to comment.  

Tuesday, November 1, 2016

FreeNAS Build

It's been a while since my last post (over a year). Life has taken me in several different directions since then. In February of 2015, my wife and I found out we were expecting and in October of 2015 we had a beautiful baby girl.  On the career-front, I passed my CCNP SWITCH in early March of 2016 and I have been actively working on the ROUTE test. I have been taking my time as I'm in the first year of parenthood and, as always, I want to make sure that I really learn the material; not just pursue a certification with nothing truly gained from the journey. Outside of the Cisco world, I did manage to build a much needed Network Attached Storage (FreeNAS-based). I evaluated building vs. buying and there wasn't much price difference in what was available for me to buy pre-packaged and what I could build. So I figured, why not build and learn something? 

First things, first... The BoM...

Motherboard:
  • Micro-ATX 
  • LGA 1151
  • 64GB Max Unbufferred DDR4
  • 8x SATA Ports / 6.0G
  • Dual 1Gbps LAN
  • Dedicated IPMI 
  • 4x PCI Expansion Slots
CPU
  • Skylake
  • 3.4 GHz
  • LGA 1151
  • Quad Core / HT 
Memory
  • 16GB DDR4
  • Un-Buffered
Storage
  • 80 GB 
  • Enterprise SSD
4x WD Red 3TB NAS HDD (Datastore)
  • 3TB
  • 5400 RPM 
Power
  • 650W
  • Modular
  • 80 PLUS Bronze
Case
Fractal Design Node 804 Black  (Not racked  -_-' )
  • Micro-Mini ATX Compatible
  • 10 potential 3.5" Disks + 2 Dedicated 2.5" Disk unit positions 
  • Chambered Design 

So basically what I ended up building was a cube-style NAS powered by a Skylake Xeon with 32GB DDR4 memory and dedicated IPMI. For the last three or four years I had been toying with the notion of building or buying a NAS, and in the the event of a 'build', FreeNAS was always my number one OS choice (though i reviewed others). FreeNAS seems to offer more robust and mature features considering it's large community. 

Of course the most interesting detail about a NAS is the storage. A lot of people in the FreeNAS forums recommended using a USB for the OS(boot) drive, but I opted for two mirrored SSDs for more reliability.  On the datastore front, the most popular choice for a NAS build seems to be the Western Digital Red series drives. Not looking to build a super-high capacity storage node, I selected four 3TB WD Red NAS HDDs. Using ZFS, I configured the four disks in RAIDZ2 which requires a minimum of four disks and uses two for parity. RAIDZ2 (RAID 6) configurations can potentially withstand the loss of up to two disks according to my research. 

Check out the final product. 


This NAS build very quickly became an integral part of my lab and even my family's personal use. On the lab side, I use the NAS as a backup for my network configurations and templates and software repository. The biggest impact that the NAS has had on my labs has been its integration with my ESXi server. I use Veeam to back up all of my VMs to the NAS over SMB. I also use NFS to host my virtual machines and iso files with little to no performance difference while greatly increasing my storage flexibility.

On the personal side, myself and my wife use the NAS as backups for our computers and phones with all of our family pictures and files copied there regularly. I run both Plex and ownCloud jails from the NAS for home media server and Dropbox-like functionality, respectively. I also create images of all of our home computers using Clonezilla and store them there, having tested restoring from them successfully. 

So far I have been running my FreeNAS solution 24/7 for six months with zero issues. One of the best things I can say about FreeNAS is the all around flexibility of the system. Currently I run several file sharing protocols all from the same box including CIFS/SMB, FTP, and NFS. This flexibility makes the NAS accessible from almost any device and any OS. 

I would highly recommend FreeNAS as the OS of choice for any one looking to build a personal NAS. It's very feature-rich and FreeBSD (on which it's based) seems to be a solid, dependable operating system. The only drawback is depending on your build, FreeNAS has some recommended hardware minimums that may not be friendly to builders on a tight budget. My build is likely considered small but still totaled around $1700 to assemble. With any NAS build, the largest percentage of the cost will depend on your desired storage capacity and configuration. I built for scale (add more later) ;-) Another bit of advice that I would give to anyone looking to build a FreeNAS based storage system is to check out the FreeNAS forums. I never directly posted but I found the advice from users there extremely helpful; especially the moderator, cyberjock. FreeNAS can be one of those builds where you have to be very selective about some of the hardware being used and it would be very wise to use a starting point like the forums. 

Have a similar build or are you looking to build something similar? Feel free to comment.